Difference between revisions of "Editorial Update/Tables"
(Created page with "==Tables: Inserting New Rows in Tables== The following example shows an instruction to insert a new entry 6 in a table, after entry 5: File:Tables_instruction_example.png|...") |
|||
| Line 45: | Line 45: | ||
For more complex amendments to tables consult a <strong>Review Editor</strong>. | For more complex amendments to tables consult a <strong>Review Editor</strong>. | ||
| + | |||
| + | ===Inserting multiple rows into a table=== | ||
| + | |||
| + | If your amending involves inserting more than one consecutive row, there should be one set of brackets encompassing the amendment, for example: | ||
| + | |||
| + | |||
| + | [[File:Table_multiple_rows_2|800px]] | ||
| + | |||
| + | https://editorial.legislation.gov.uk/ukpga/2009/1/section/83A | ||
Revision as of 09:18, 26 April 2021
Tables: Inserting New Rows in Tables
The following example shows an instruction to insert a new entry 6 in a table, after entry 5:
XMetaL has some standard options for creating new rows in a table. Use these rather than copying and pasting the tagging provided in the amending provision. It is highly unlikely that the tagging in the amending provision will match the existing tagging in the amended provision, and if you copy and paste different tagging styles it will invalidate the amended provision.
In this example, you can see that the table in the amended provision is tagged slightly differently to the amending provision (the entry number in the amending provision has <ukl:pnumber> tags, whilst in the amended provision it does not and appears as part of the text in the first column):
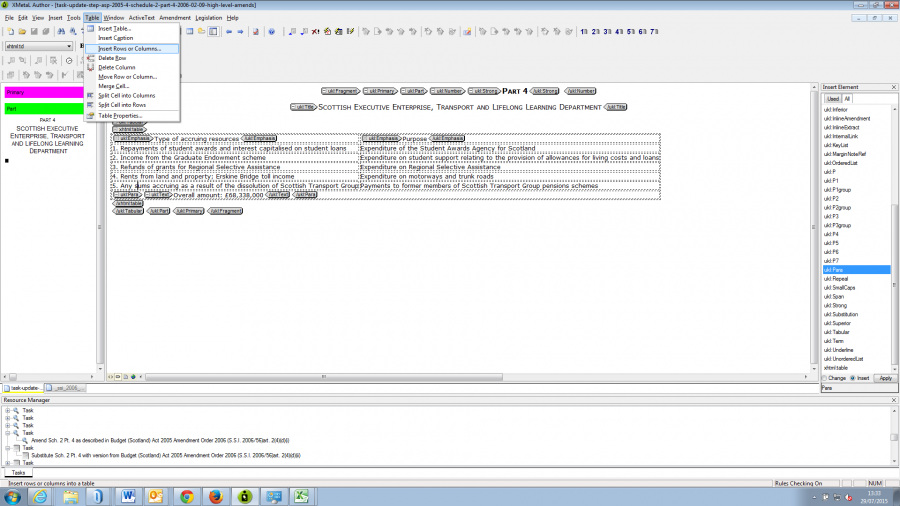
To insert a new row in the table, in the amended provision put your cursor in the row immediately before the position of the new entry, in this case in entry 5, and using the menu options select Table - Insert Rows:
A pop-up window will appear asking for you to confirm where to insert the row. Simply select the appropriate radio button Insert row below:
This will insert an empty row in the appropriate place:
Now return to the amending provision and, from the first column, copy the words you need to insert. When deciding what to copy, follow the tagging style of the existing entries in the amended provision. In this example the existing entries in the amending provision have no additional tagging so you only need to highlight and copy the words:
Move back to the amended provision. Position your cursor in the first column of the new row in the table. Highlight the task and select Legislation - Textual Amendments - Addition to insert the words:
You should now see that the new words have been inserted into the table, enclosed by <addition> tags. An auto annotation will appear at the bottom of the table giving authority for the amendment:
Note: in this case you will also have to add in the entry number '6.' by typing this in at the beginning of the inserted words, because it was enclosed by <ukl:pnumber> tags in the amending provision and was not included when the text was copied and inserted.
Repeat the steps above to insert the remaining text into the next column, highlighting the same task in the Resource Manager, so that you have the same commentary annotation for each set of words you insert. There will be separate <addition> tags enclosing each set of words inserted. You will need to delete the addition tags for the second set of words you inserted and cut and paste the closing </addition> tag from the end of the first set of words to the end of the second set of words you inserted, so that both sets of words are enclosed by the first set of addition tags.
You will end up with one set of square brackets for the text inserted into the new row when you preview your amendment on the website:
For more complex amendments to tables consult a Review Editor.
Inserting multiple rows into a table
If your amending involves inserting more than one consecutive row, there should be one set of brackets encompassing the amendment, for example:
https://editorial.legislation.gov.uk/ukpga/2009/1/section/83A


